26
21
submitted 7 months ago by catfishsushi@midwest.social to c/diy@beehaw.org

I'm (obviously) not great with caulk but needed to re-caulk where our kitchen counter meets the outside wall as it has a crack all along the counter. House was built about 20 years ago and it may be original and just settled.

Anyway, I watched a video and the person put down painters tape on the wall and along the counter so you could get a straight edge. They showed pulling off the tape pretty quickly after applying the caulk. I did so and the caulk pulled up from the counter (and, to a lesser extent away from the tile on the wall.)

Is this an OK technique to use, generally? What could I have done to keep this from happening? I had cleaned the surface well. Should I have pulled the tape off with an angle closer to the counter? I think I pulled it off about 45 degrees. Would it hurt to wait a little longer for the caulk to adhere to the surface a bit? I'm concerned if it starts to cure much at all that it will be harder to pull off the tape without pulling the caulk away from the wall.

Going to wait until it dries, then scrape it out and try again. This is a small section that I'm using to work on my technique.

Thanks.

27
7
submitted 7 months ago by petrescatraian@libranet.de to c/diy@beehaw.org

I have a few project ideas, and I thought of reusing the paper from various shop catalogs that I receive in my physical mailbox. I'd like to make it stiffer, something more like cardboard. I read somewhere online that you could use corn starch for this, mixed with water. Would it work? Do you have better ideas?

28
9
submitted 7 months ago by LemmyPlay@lemmings.world to c/diy@beehaw.org

Hi all. I'm splitting 2 XLR line level audio signals into 3 channels each. I bought one nice device (used) online called the Whirlwind SPL1x3LL (line level). Unfortunately I can't find another used one for a decent price. However there are plenty of mic impedance matched units, SPL1x3MIC which according to the manufacturer are identical except the impedance difference. I'm good at soldering and the devices are fully analog (no PCB), so I'm considering doing the conversion myself.

I was curious what it would likely take to convert the mic box to a line level box? Is it just a matter of adding a resistor somewhere? Seems like an easy way to save $100 without buying a brand new unit. I looked into my line level box and the is one component I don't recognize where the out signals split away from. My only hesitation is that I buy the device and end up needing a specific part or it turns into a larger job than anticipated. Just figured I'd entertain the idea before buying brand new. Thanks.

29
25
submitted 8 months ago by Vodulas@beehaw.org to c/diy@beehaw.org

I am stripping and re-sealing a corner shower stall, and am having a hell of time removing all the old caulk. I also discovered the previous homeowners decided to just caulk over the previous caulk that was on there, so I am removing 2 or 3 layers depending on the location. It was leaking in the spots that had 3 layers so I think they just added more caulk to "fix" leaks. I have the chemical caulk remover, and that certainly helps, but it still is taking a metric fuck-ton of manual labor. Any tricks/suggestions for removal of very old caulk? I am about to throw a scotch brite on a palm sander and go to town.

30
74
submitted 8 months ago by Uprise42@kbin.social to c/diy@beehaw.org

I posted on here the other day about some suspicious 240v cable and followed the recommendations to replace it. I was already leaning that way but was kind of hoping to be told I was overthinking it. But you all confirmed what I thought. I ran close to 25’ of 10/2 cable from the second story to the basement. Nothing is wired yet because it is late and I don’t want to turn on the main breaker.

My step dad let me borrow a 50’ fishing tape and 10’ endoscope which were really helpful. I did not have to cut any walls!

31
24
submitted 8 months ago* (last edited 8 months ago) by Uprise42@kbin.social to c/diy@beehaw.org

Hello,

I have been doing a lot of work remodeling a house I bought. The house was in really rough shape so I was expecting a good bit of work but the last owners laziness and incompetence has really made things worse.

They had the house split into two apartments and we are converting it back to a single home unit. We knocked out a wall and installed new stairs to connect the top and bottom floors. Next we are converting the upstairs kitchen to a laundry room. We have been using the makeshift room for a few months, but we are getting a new washer and dryer. Our current dryer is a compact electric dryer that runs on a 120v outlet. The new will be a standard electric dryer and need a 240v outlet. There is 240v outlet in the room for a range. I am going to pick up a new breaker from lowes with the proper amperage but wanted to check everything else first and I think I ran into an issue with the wire itself.

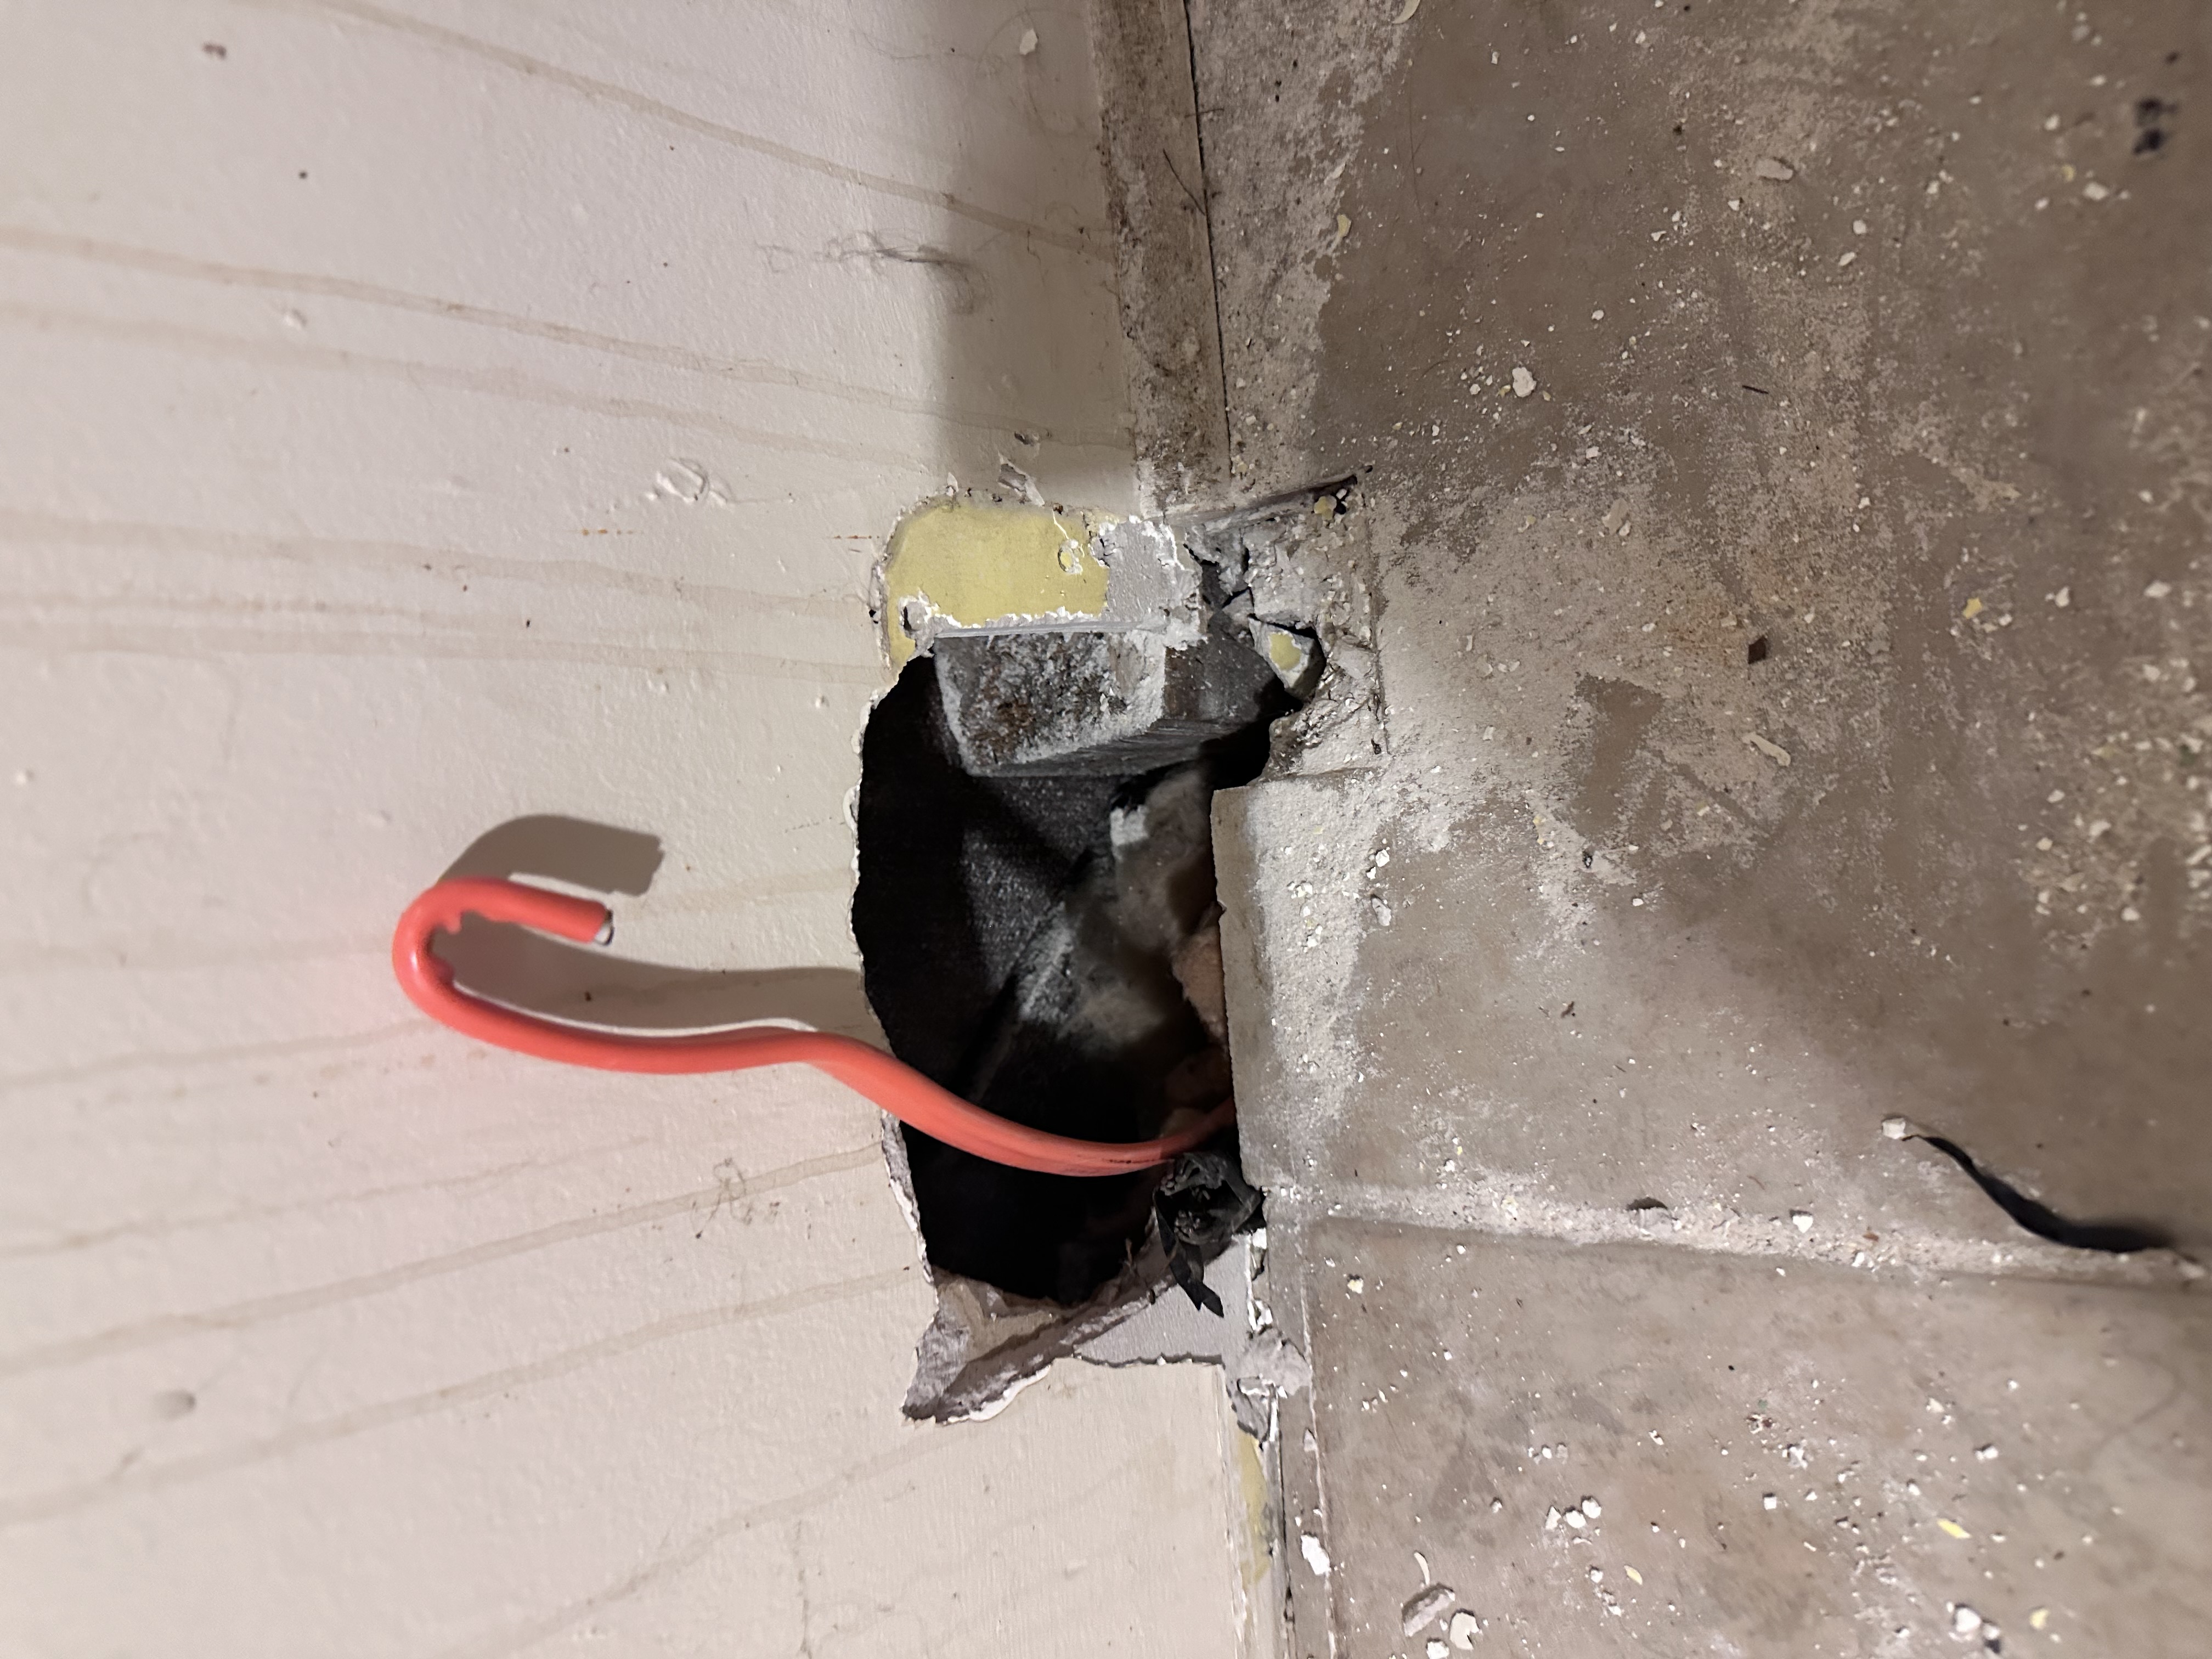
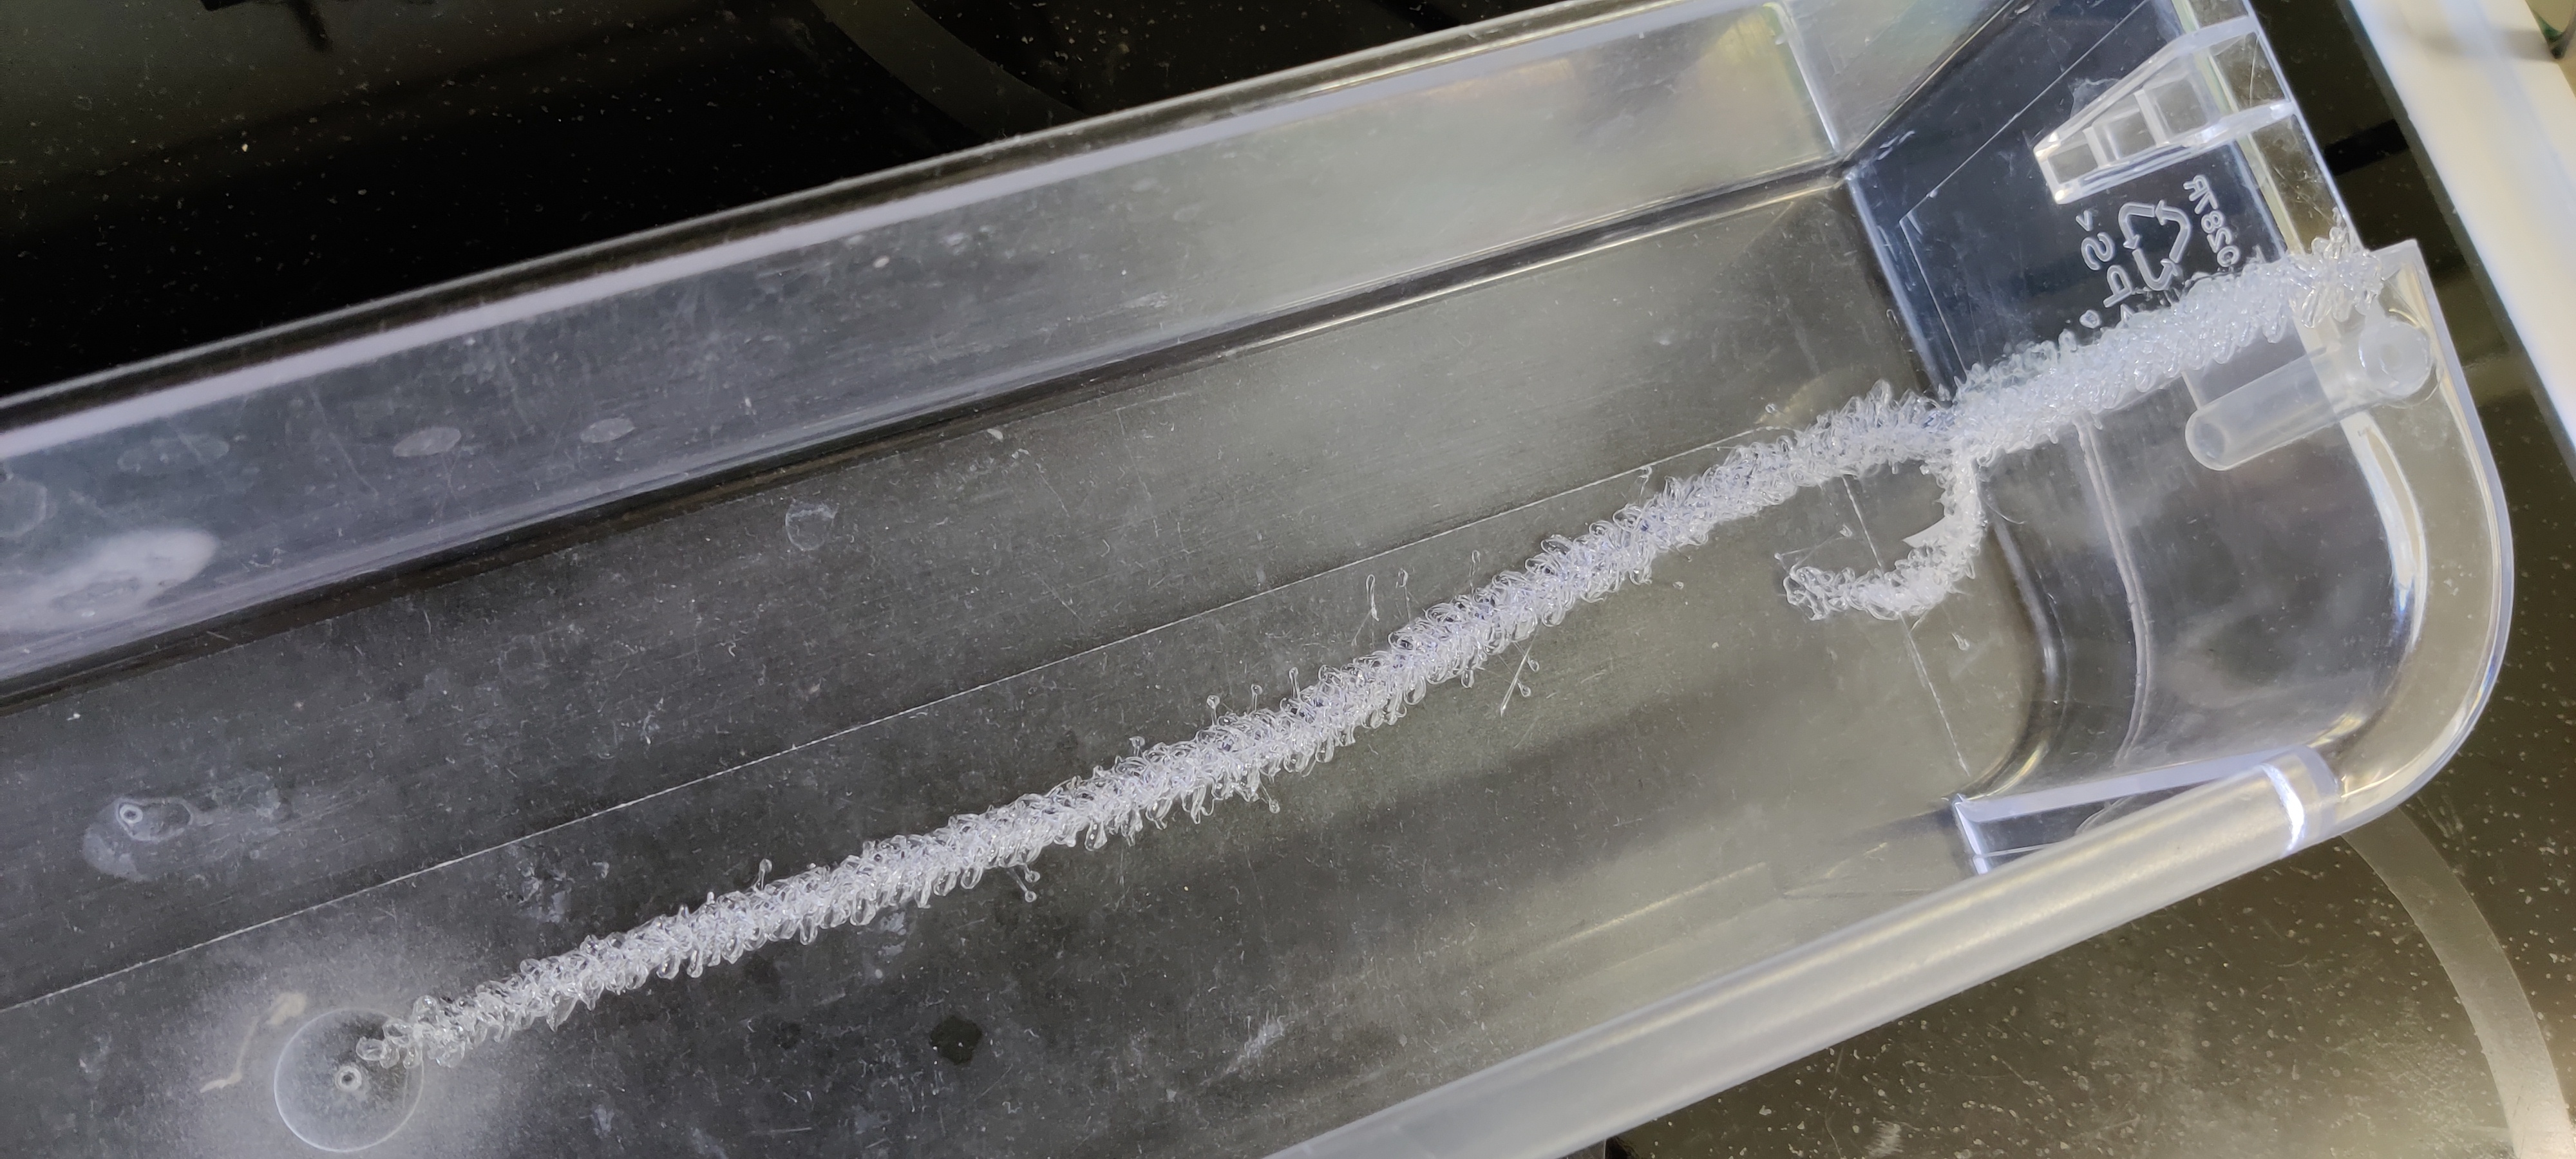
There are 3 wires, which matches the outlet so I am assuming it is supposed to be 2 hots and a neutral. However, upon closer inspection there is no insulation on the neutral. I peeled back more of the larger insulation around all 3 wires but the neutral wire is uninsulated like it was a ground. Now, I have encountered this in the house elsewhere. Most of the outlets have grounds cut off, but a 3 way switch didn't have the second hot wire so they used the ground as the second hot. I got that "fixed" (I unhooked everything and made it a single switch/light circuit and eliminated the second switch). But I don't know of any 240v wire combinations that would only be 3 wires and include a ground. The wire is definitely thick enough to be 240v wire and each individual wire has multiple "threads" like a 240 wire would. But it is older wire as well so I am not sure if it is just that old that they didn't insulate neutrals when they did this. Is this wire safe to use?

A second, and more minor question, deals with a separate circuit. The house electric is still split and I pay 2 bills, one for upstairs and 1 for downstairs. The upstairs does have an outdoor AC unit on it as well that was installed after we moved in by an HVAC tech so I am trusting that to be installed right. But the entire box for the "upstairs" has 4 breakers. There is a 50amp, 40amp, and 20amp double pole breakers and a 10amp single pole. The 10amp controls a single light and one of the 240v breakers controls the AC. Another controls the range/future dryer outlet. The The 20amp double pole controls everything else upstairs which is ALL 120v. There are a few lights and all of the outlets. Is that safe? Is there a reason to do that? The upstairs is pretty small if that makes a difference, I have just never seen a double pole breaker used for a 120v circuit even if it is pretty large.

Edit: I made the original post on my PC due to the size but I’m adding some pictures from my phone

Edit 2: I am going to buy and run new wire with the new breaker. I showed a picture to my dad and he said nothing matters because that’s an aluminum ground which means the wire needs replaced due to its age regardless. So even if it’s wired wrong now, I am stripping the wire out and putting a new wire and breaker in so it should be done right

32
36
How to Build a Small Solar Power System (solar.lowtechmagazine.com)
submitted 8 months ago by alyaza@beehaw.org to c/diy@beehaw.org
33
28
submitted 8 months ago by CadeJohnson@slrpnk.net to c/diy@beehaw.org

I have been investigating the fine art of dishing out a wooden chair seat for comfort today, and made discoveries that can be readily condensed into a, imho miraculously easy formula. So here goes:

Your "sitz" bones or ischial tuberosities are prominences of the pelvis that are the hard spots when you sit. They are pretty consistently located in adult humans as it turns out, though you'll have a hard time finding dimensional data if you go looking! I measured approximate spacing among a slightly inebriated and jovial crowd who endured the indignity with humor and made a rough prototype seat to check my theory. Drill two 2-inch diameter holes spaced five inches apart at center (3-inches of material remaining between the holes). For a finished seat, one would shape the edges, but don't even bother for this experiment - just drill the holes in a piece of lumber and sit down on it. shift around for comfort and when your ischial tuberosities align with the holes you will say aaah!

I will be making two holes in a rectangular stool seat at this spacing, centered about three inches from the "back" edge of the stool, and sanding smooth and dishing out the seat a little. I'll try to remember to post a finished picture, but I found this preliminary result too great and dramatic to wait.

Some individuals might be grateful for a third hole at the centerline and about two inches closer to the back edge - where a tailbone-afflicted person does not need hard support and an average person will not miss it. I have not tested this third hole yet, maybe others will report...

34
10
submitted 8 months ago* (last edited 8 months ago) by pcgaldo@lemmy.ml to c/diy@beehaw.org

Crossposted from: https://lemmy.ml/post/9698836

This setup allows Arduino to read temperature, control relay based on setpoints, display info on OLED screen, and manage date/time settings with user input through buttons. Adjust based on specific hardware/project requirements.

Designed to replace the faulty electronic control of a blue heat radiator.

Code and simulation at Wokwi

Licensed under GNU GPLv3.

35
7
submitted 8 months ago by jaykay@lemmy.zip to c/diy@beehaw.org

Hi, I have an Indesit 15b1 and it won’t run a cycle. When I turn it on, I get a error code, 3 green solid, amber start light and red flashing salt light. Nothing about it in the manual, Indesit said the same thing.

It sometimes starts working after I tilt it for a bit.

It’s not the anti flood device, the bottom is dry. I took the drain pump out, it’s clean, so is the drain hose and inlet hose.

When I turn it on, it drains the water, then I THINK it tries running the wash pump, and then tries draining again, and the pump again, and the error code.

Is there anything I can do before I take the wash pump out? I kinda don’t wanna do it cos it has those one time pinch clamps and I’d need to buy them and all

Thanks :)

36
7
Laptop DIY (lemmy.zip)
submitted 9 months ago by ErevanDB@lemmy.zip to c/diy@beehaw.org

I am using an old HP Pavillion 15 to make a tablet. I have all of the internal components, and am making a shell. Does anyone know what the easiest way to make a case for those parts would be?

37
26
submitted 9 months ago* (last edited 9 months ago) by bermuda@beehaw.org to c/diy@beehaw.org

So my roommate is a habitual cigarette smoker. He doesn't smoke indoors (thankfully) but he does smoke about every other night outdoors. I don't think he realizes that when he's done smoking the smell sort of... lingers on him and his clothes. Last night after he was done he was in the kitchen for a bit cooking. I came in this morning to make a sandwich and the smell was all over the kitchen and very pungent, it made me think some food was rotting. This kind of thing happens probably once a week, and while I'm kind of used to it by now I do want to have people over and have them actually be comfortable.

Apart from asking him to quit (I doubt it) is there any sort of concotion or thing I can make / spray / sanitize to get rid of the smell? Some days it's nonexistent but other days it's almost unbearable.

38
7
submitted 9 months ago by HurlingDurling@lemm.ee to c/diy@beehaw.org

Hello everyone, I am pulling my home's existing ethernet cables from the garage and into my home to install a network rack. Currently my garage does not have insulation (for a future project), so it get's too hot during summer for my router to live there, so I want to install it in my mudroom where there is insulation. My question is if I drill a hole to put some sort of cable cover (ie. https://a.co/d/1hHosME) will it affect my home's insulation too much where I should be doing something else? If so, what should I do to improve the cable runs?

39
8
submitted 9 months ago by diyrebel@lemmy.dbzer0.com to c/diy@beehaw.org

cross-posted from: https://lemmy.dbzer0.com/post/8959162

I had a rod that was threaded on one half and smooth on the other half. I needed the smooth half to be installed into brick.

method 1: chemical anchor

The normal way to do this (I think) would be to cut some grooves into the rod using an angle grinder, drill a hole that has a diameter that’s ~2mm bigger than the rod, and use chemical anchoring. But that stuff is pricey and only lasts ~1 year on the shelf. Thus cost ineffective for 1 use.

method 2: ad hoc chemical anchor substitute

Similar to the above, I wonder if general 2-component household epoxy would work as a substitute in the above method since people are more likely to have that on-hand. I suspect the issue is that it’s too thin and gravity would do its thing and the topmost area would not get filled with epoxy. Hence why I did not attempt it.

method 3: (What I did)

The rod measured at ø=8.8mm. I had no 9mm drill bit for masonry (and that would be too loose anyway). So I used a nominal 8mm masonry bit on a hammer drill. I’m not sure what the actual diameter of that resulting hole was, but it was too tight to push in the 8.8mm rod in by hand. So I tapped it in, dry (no oil or glues). It worked! It feels really solid. Feels like I got away with murder.

Questions

(method 2) Is there something could be mixed with common 2-component household epoxy to thicken it so it acts more like chemical anchor epoxy?

(method 3) Did I take bad risk with fracturing the brick? Is there perhaps a guide somewhere that safely maps brick hole diameter to metal rod diameter? Or is this something is never done and should never be done?

40
15
submitted 9 months ago by activistPnk@slrpnk.net to c/diy@beehaw.org

cross-posted from: https://slrpnk.net/post/4160051

There are several DiY communities in the fedi but if we ignore the big centralized instances, there is:

Perhaps each would consider mentioning the other sister community in the sidebar?

41
13
42
30
submitted 10 months ago by toothpicks@beehaw.org to c/diy@beehaw.org

I'm trying to learn how to sharpen scissors. I'm using a draw-filing technique. I'm not sure where I'm doing right or wrong. Anyone has any input? It's a little better than it was but it's definitely not as sharp as it could be. Gonna try attach some pics.

43
7
submitted 10 months ago by Rambler@lemm.ee to c/diy@beehaw.org

We've got a small log burner with a light grey stone surround.

Every time I open the door to poke the logs, bits of soot fall out and mark the stone when I brush them up.

I'm getting a little worried as the house is rented, so I want to leave it in good condition.

I've tried washing liquid and cream cleaner but they just don't shift the stains.

Does anyone have any good tips that might help. I'm in UK, so products I can get my hands on here would help.

Many thanks.

44
17
submitted 10 months ago by Pxtl@lemmy.ca to c/diy@beehaw.org

Well, the dryer has been disassembled and vacuumed, the dead coil removed, the new coil swapped in, ready to reassemble as soon as the new belt arrives. I was surprised how much of the brown shmutz in the heater was just ash from the coils - it dusted off quite shiny after I replaced the coil.

Before

busted heating element before

After

repaired heating element

I'm a little worried about the visibly duller part of the heater assembly, hopefully that won't absorb too much heat - I tried to cluster the coils a bit looser there to compensate.

It's even visible on the reverse side.

dull area where burn happened

Either way, I'm reassembling tomorrow when the new belt arrives.

dryer interior

45
8
submitted 10 months ago by sexy_peach@feddit.de to c/diy@beehaw.org
46
13
submitted 10 months ago by Pxtl@lemmy.ca to c/diy@beehaw.org

I feel like I have a moral responsibility to attempt to repair anything before making it waste. So I'm trying my hand at the dryer. Sadly I didnt' realize that the whole tub joint pops upwards so I detached the tub from the join and then found the join comes off pretty easy anyways.

Anyhow, everything is made of garbage these days:

Photo of disassembled Kenmore stackable washer

Photo of broken heating coil

But I think I can replace that. But while I'm in there: any recommendations on how to lubricate the tub joint? Anything else I should be replacing while I've got it apart? I noticed the tape sealing up the exhauste has disintegrated so I figure I should replace that with a strip of aluminum duct tape.

47
54
Made a table (slrpnk.net)
submitted 11 months ago by CadeJohnson@slrpnk.net to c/diy@beehaw.org

Table top is four 50-pound bags of ready-mix grout concrete (no stone, just sand), 3m of 1m wide 1x2inch fence mesh.

Chairs were solid white upholstery. We bought them in a second-hand store and painted with diluted acrylic (to hide old stains). Waiting 30 days before I apply sealer to the concrete.

48
25

Yes, now it looks like frankenshelf. Adds character. What do you think?

49
12
submitted 11 months ago by Chastity2323@midwest.social to c/diy@beehaw.org

cross-posted from: https://midwest.social/post/4040473

Every once in a while, the heating element seems to break on my Gaggenau EB 378 610 oven. Other than that, it works fine.

This time though, I am unable to find a replacement part since the manufacturer discontinued it. I searched everywhere online and on eBay, but was still unable to find it.

I would rather not buy a new oven since that would be very expensive and I like this one. Does anyone have any ideas about where I can find a replacement heating element? Or am I out of luck?

It's a convection element, part #00098494, 100L

50
16
submitted 11 months ago by pokemaster787@ani.social to c/diy@beehaw.org

Hi everyone,

As the title says, recently purchased my first house (yay), but while I initially noticed these stains in the floor during a daytime walkthrough, I realize now they're a lot more bothersome when it isn't super bright inside. Images in the attached link

I'm not moving in for a few weeks, so wondering if I can fix this beforehand (I know for a fact it won't happen at all if I wait until after I've moved in...). It's mainly this one section in the hallway and one of the bedrooms, as shown in the pics.

I did some initial research and it seems that they're likely going to need to be completely refinished, and I had a few questions about doing that myself (or would love to hear if there are other options!).

  1. How easy of a task is this for a beginner to woodworking etc.? Most of my DIY has been in the realm of tech, so I don't have any experience or needed tools. Maybe I'm in over my head here and it isn't something I can do myself.
  2. What tools/equipment do I need? I believe just a sander (any recommendations would be nice), wood stain, and sealant. Plus brushes to actually spread the stain/sealant.
  3. Can I just refinish the areas that are stained, or will it look horribly uneven if I do that? Do I need to refinish all of the flooring if I do some? (80% of the floor is this hardwood floor throughout the house, there's not a break in it or separate sections)
  4. Given the answer to 3., about how long would such a task take? I assume there's a lot of passive time waiting on stain, restaining, sealing, etc.

Thanks for any help, really appreciate any advice!

view more: ‹ prev next ›

Do It Yourself

7651 readers
1 users here now

Make it, Fix it, Renovate it, Rehabilitate it - as long as you’ve done some part of it yourself, share!

Especially for gardening related or specific do-it-yourself projects, see also the Nature and Gardening community. For more creative-minded projects, see also the Creative community.


This community's icon was made by Aaron Schneider, under the CC-BY-NC-SA 4.0 license.

founded 2 years ago
MODERATORS